
つくった経緯
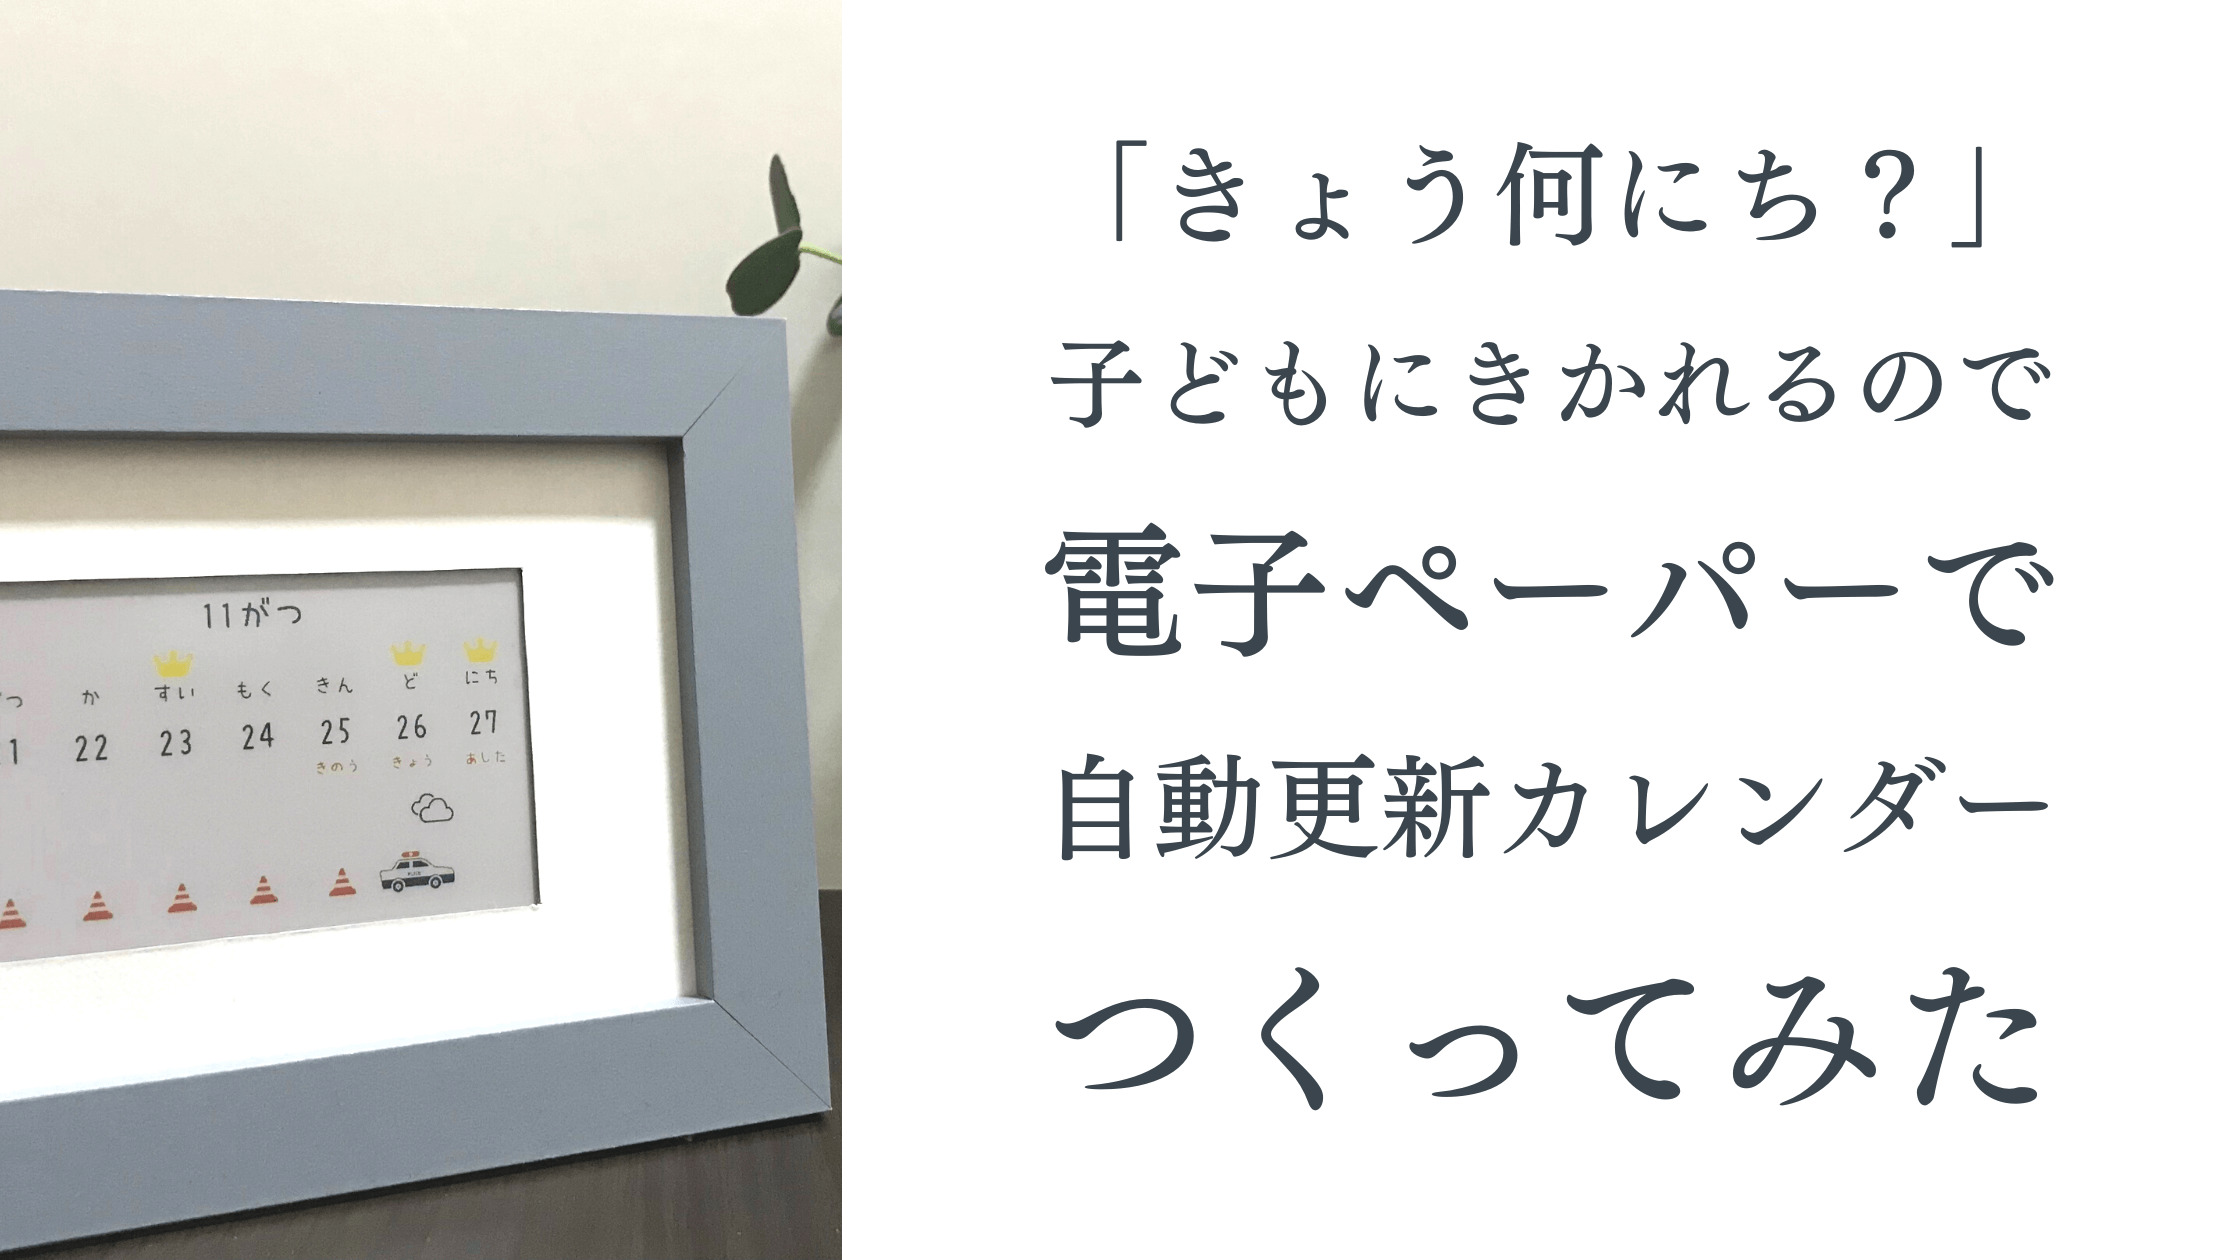
きょうは何曜日?保育園ある?
最近曜日や日付を聞かれることが増えたなぁ。
ひらがなが読めなくても今日保育園にいくかどうかがわかるカレンダーをつくってみよう。
つくるもの
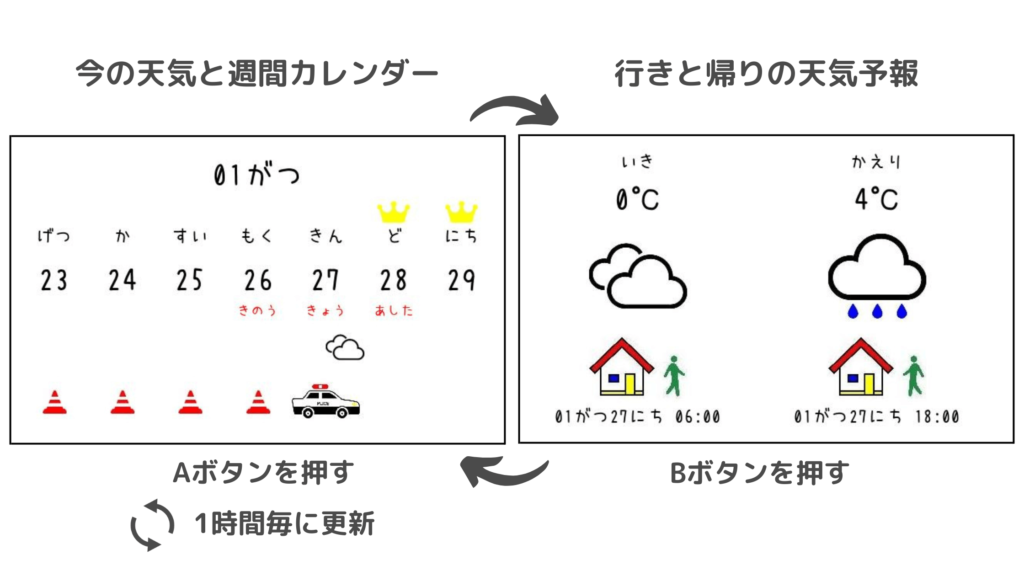
電子ペーパー横にA〜D、4つのボタンがあります。ボタンを押すと
- A:「現在の天気+週間カレンダー」
- B:「行きと帰りの天気予報」
に画面が切替わります。
Aボタンの画面が1時間毎に更新されます。
画面説明
A・Bそれぞれの画面の表示内容を説明します。
Aボタン 現在の天気+週間カレンダー
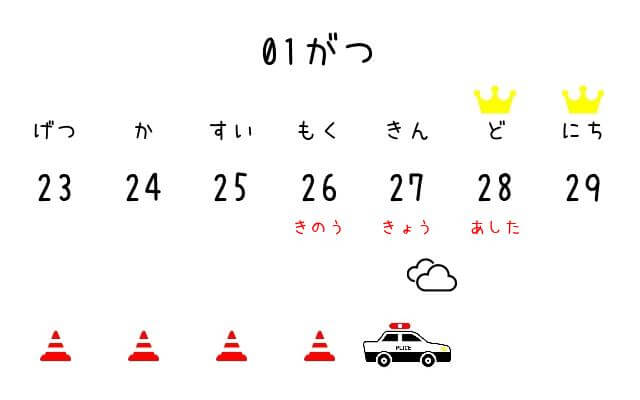
保育園がお休みの土日と祝日は、週間カレンダーの曜日の上に王冠のアイコンをのせています。
息子は3歳半なのでまだ文字が読めず、時間経過の概念もあまり理解できていません。
あしたお砂場で遊んだね!
それはきのうだよー
今日の日付の下にパトカー、過ぎた日付の下に三角コーンを配置することでパトカーが前進 = 時が進む 様子を表現してみました。

Bボタン 行きと帰りの天気予報
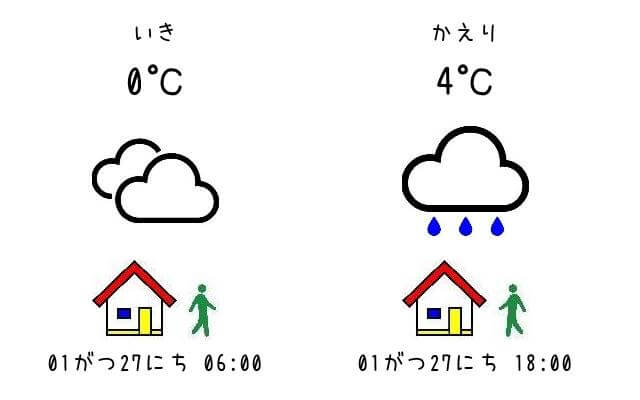
日中は会社にこもっているので、行きと帰りの天気だけ表示させています。
「帰り雨だから傘持って行こ」と確認ができて便利です。
必要なもの
Raspberry Pi 2 Model B
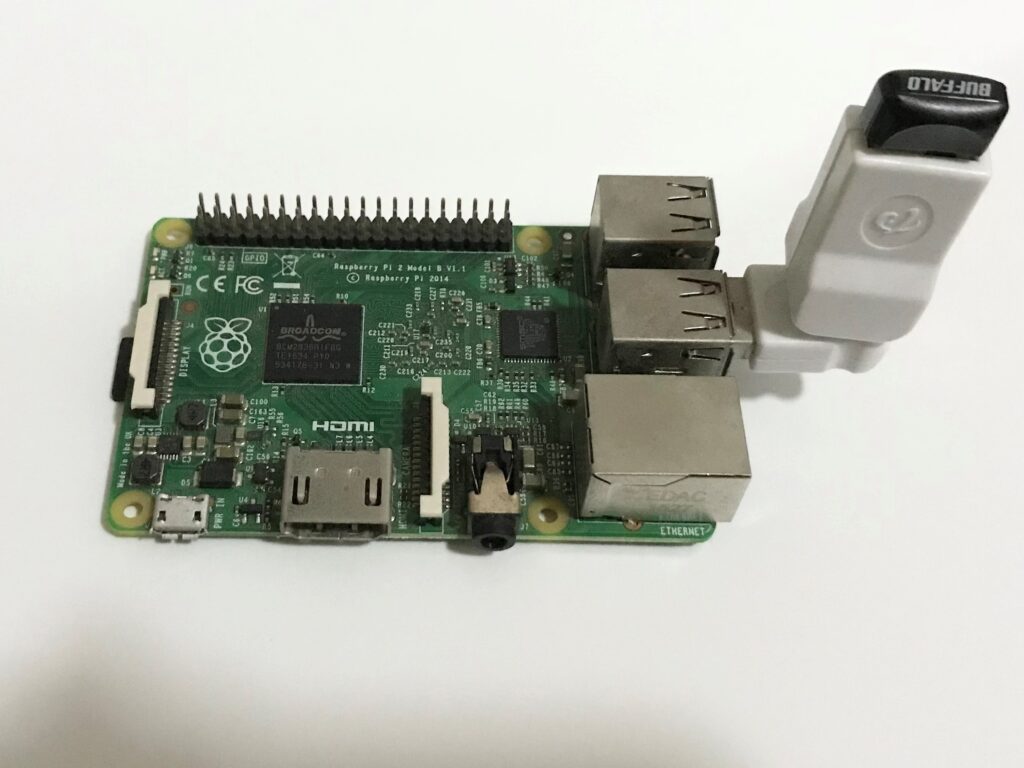
わたしはこれしかもっていないので無理ですが、セットすると見た目がゴツくなるので、Raspberry Pi ZEROシリーズの方がコンパクトでよさそうです。
Inky Impression 4″ (7色電子ペーパーHAT)
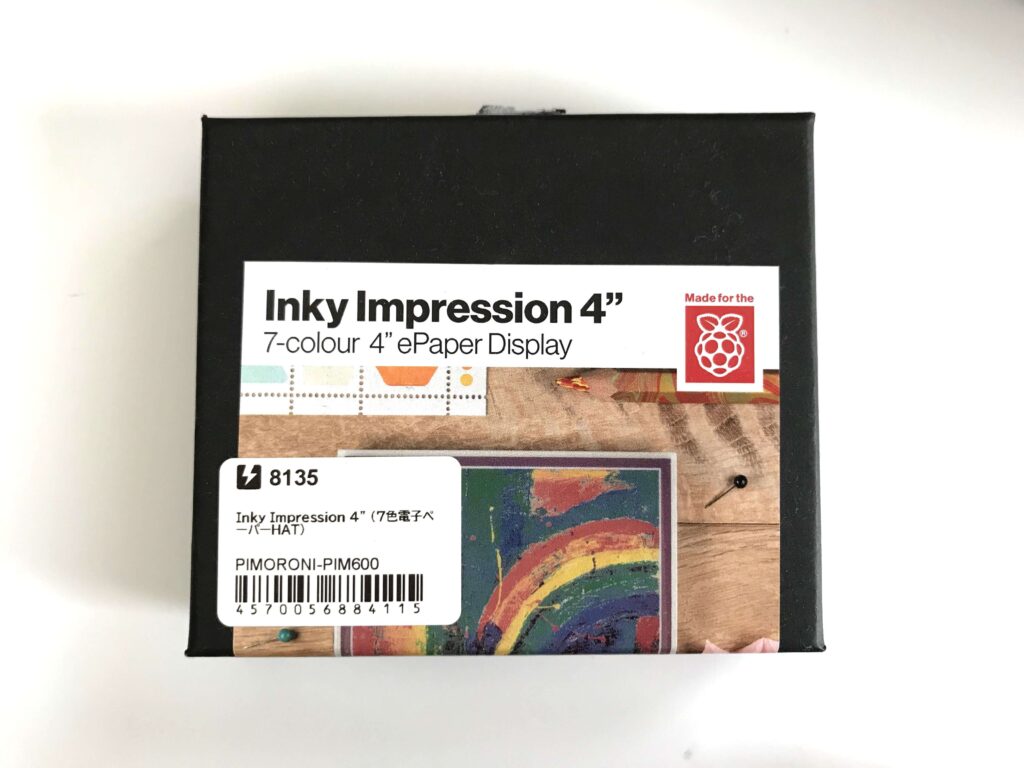
Raspberry Pi用の7色電子ペーパーです。

サイズは
- 外寸 : 97 * 69 mm
- 画面部分 : 86 * 54 mm
です。書き替えには約30秒かかります。
写真立て
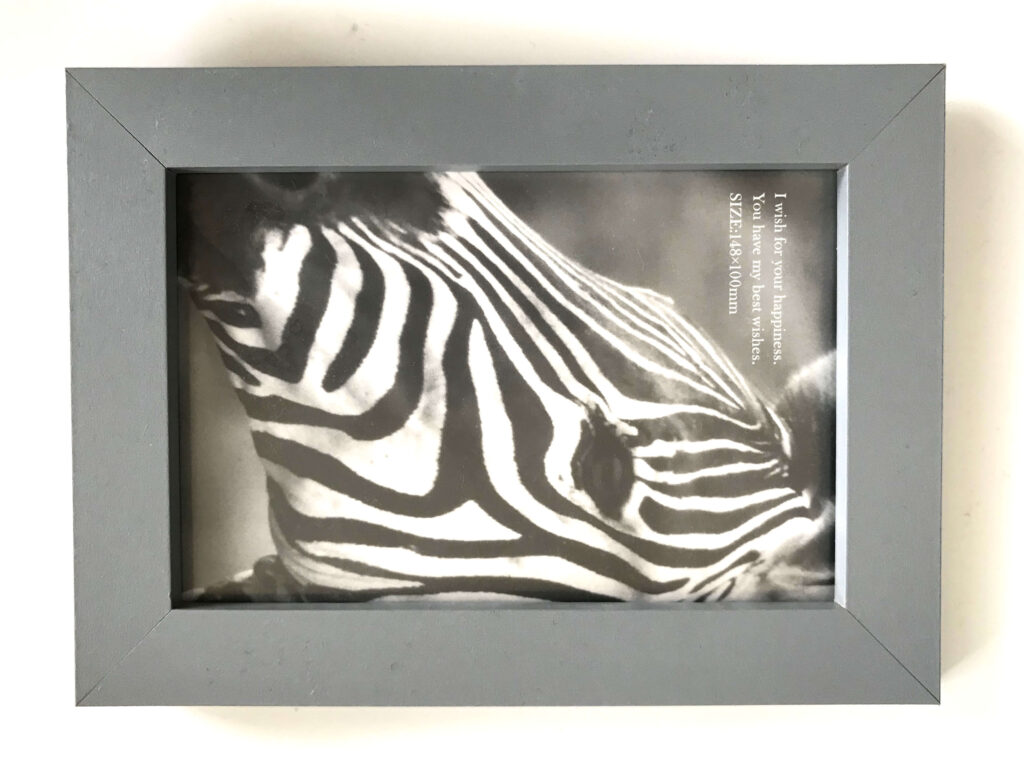
セリアで買いました。サイズはL版。
ワイヤースタンド
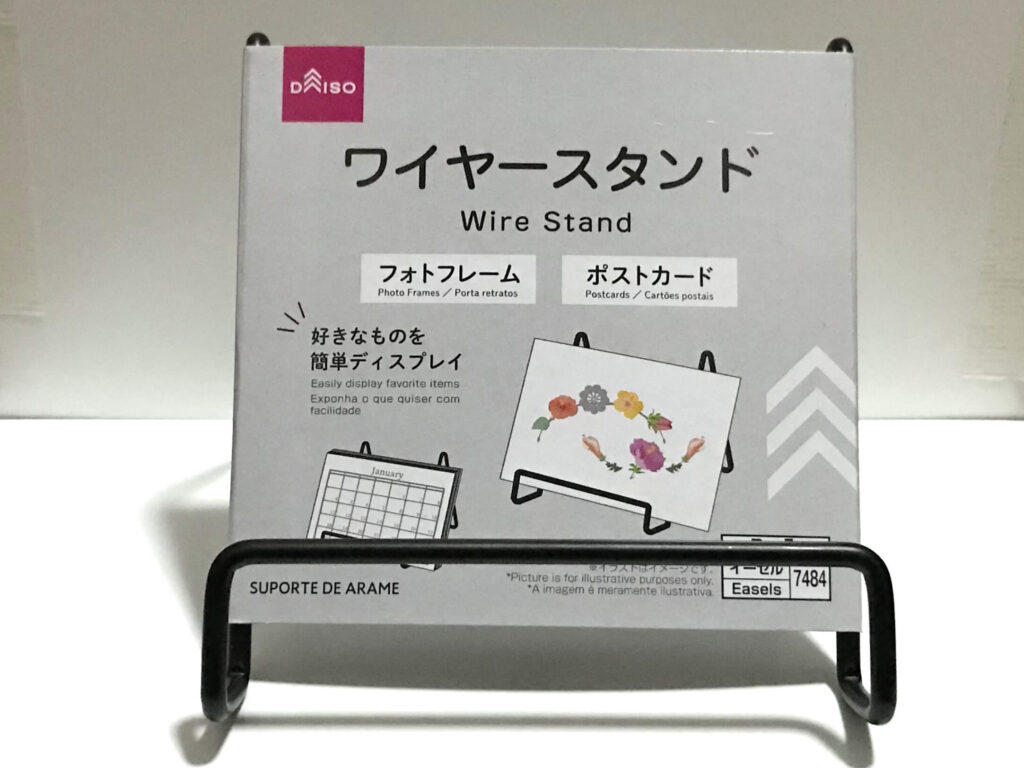
ダイソーで買いました。Raspberry Pi分厚みが増して写真立てについているスタンドが使えないのでこちらに立てかけています。
厚紙
ダイソーで買いました。ごく普通の白い厚紙なので、100均ならどこでも買えるはず。電子ペーパーを写真立てに取付ける際のサイズ調整用です。
貼れるボード(厚さ5mm)
こちらもダイソーで購入。Raspberry Pi + 電子ペーパー + 厚紙 を写真立てのフレームに取り付けるときの高さ出しに使いました。
・写真立て
・厚紙
・スタンド
・貼れるボード
は外観を整える用なので必須ではありません。
つくりかた
- STEP 1セットアップ
- STEP 2外観を整える
(必要であれば)
- STEP 3プログラム実行
セットアップ
Raspberry PiのGPIOピンに電子ペーパーを差込んで接続し、SPIとIC2を有効にします。
セットアップ方法は別記事に詳しくまとめたので、よかったらチェックしてみて下さい。
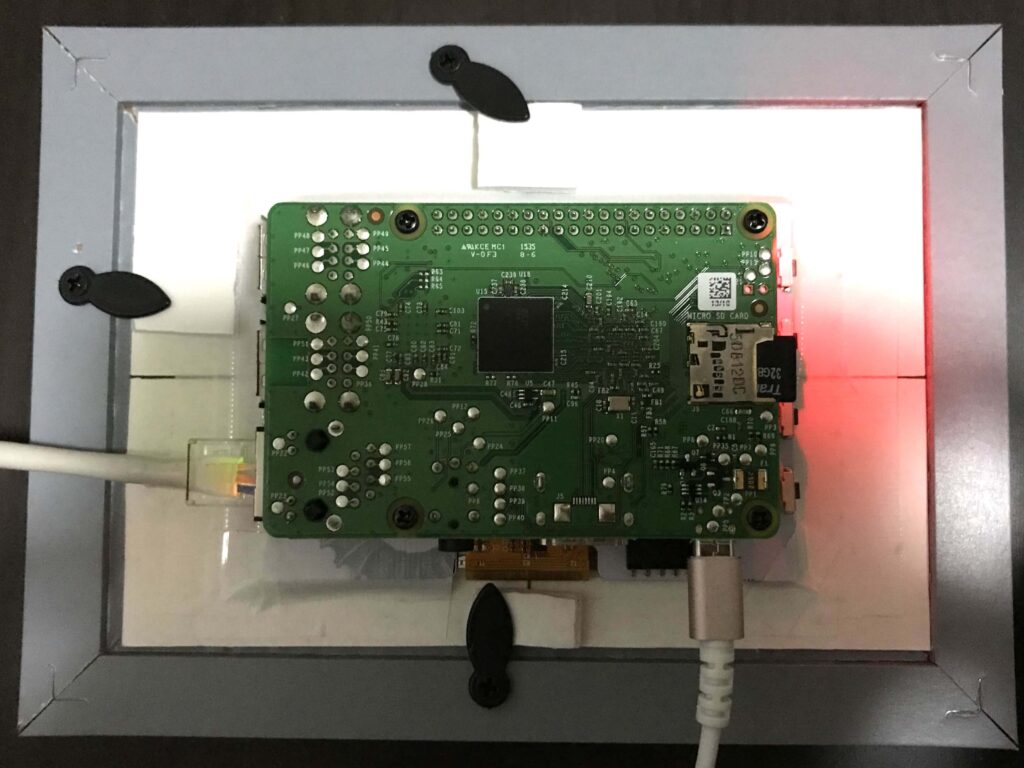
外観を整える
無理矢理つけています。裏面はなかなかのきたなさ。
厚紙を↓のサイズにカットします。
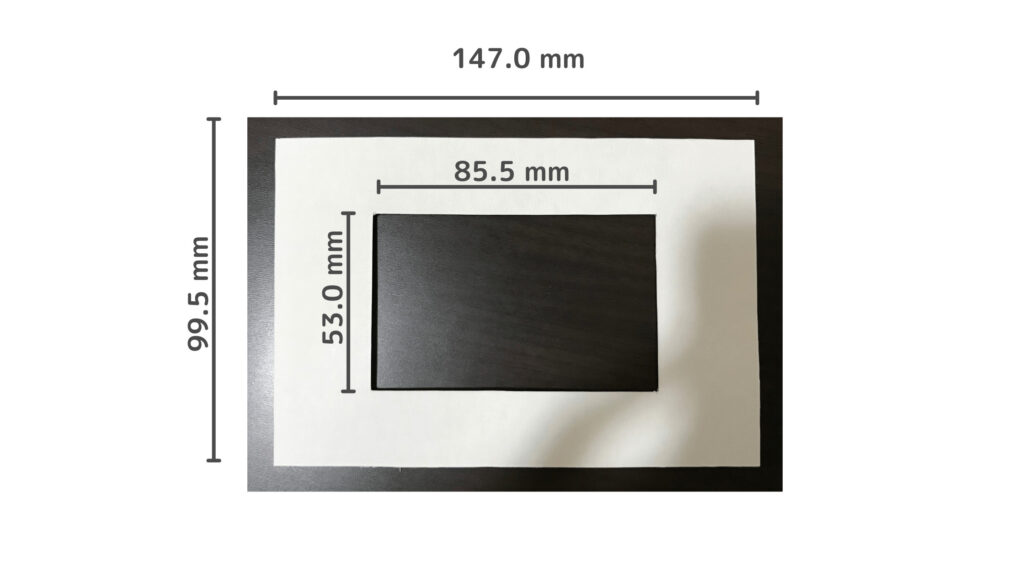
厚紙に電子ペーパー+Raspberry Piをテープで固定します。
フレームの黒い固定具(名前がわからない…)で止められるよう厚紙に貼れるボードを貼り付けます。
ワイヤースタンドにセットしたら外装は完成です。
プログラム実行
Raspberry Piの電源を入れて下記pythonプログラムを実行します。
"""
This code is licensed under the MIT license.
<https://opensource.org/licenses/MIT>

Copyright © 2023 nobo

Permission is hereby granted, free of charge,
to any person obtaining a copy of this software and associated documentation files (the "Software"),
to deal in the Software without restriction, including without limitation the rights to use, copy,
modify, merge, publish, distribute, sublicense, and/or sell copies of the Software,
and to permit persons to whom the Software is furnished to do so, subject to the following conditions:

The above copyright notice and this permission notice shall be included in all copies or
substantial portions of the Software.

THE SOFTWARE IS PROVIDED "AS IS", WITHOUT WARRANTY OF ANY KIND, EXPRESS OR IMPLIED,
INCLUDING BUT NOT LIMITED TO THE WARRANTIES OF MERCHANTABILITY,
FITNESS FOR A PARTICULAR PURPOSE AND NONINFRINGEMENT. IN NO EVENT SHALL THE AUTHORS OR
COPYRIGHT HOLDERS BE LIABLE FOR ANY CLAIM, DAMAGES OR OTHER LIABILITY,
WHETHER IN AN ACTION OF CONTRACT, TORT OR OTHERWISE, ARISING FROM,
OUT OF OR IN CONNECTION WITH THE SOFTWARE OR THE USE OR OTHER DEALINGS IN THE SOFTWARE.
"""

import calendar
import datetime
import json
import requests
import RPi.GPIO as GPIO
import time
from PIL import Image, ImageDraw, ImageFont
from inky.auto import auto
import jpholiday
import schedule
import logging

#set_font
big_font = ImageFont.truetype("uzura.ttf", 40)
middle_font = ImageFont.truetype("uzura.ttf", 24)
small_font = ImageFont.truetype("uzura.ttf", 18)

#weather_icon_dic
icon_dic={'01d':'01d_clear_sky','01n':'01d_clear_sky',
          '02d':'02d_few_clouds','02n':'02d_few_clouds',
          '03d':'03d_scattered_clouds','03n':'03d_scattered_clouds',
          '04d':'04d_broken_clouds','04n':'04d_broken_clouds',
          '09d':'09d_shower_rain','09n':'09d_shower_rain',
          '10d':'10d_rain','10n':'10d_rain',
          '11d':'11d_thunderstorm','11n':'11d_thunderstorm',
          '13d':'13d_snow','13n':'13d_snow',
          '50d':'50d_mist','50n':'50d_mist'}

API_KEY = "*****"
LAT = "*****"
LON = "*****"

inky = auto(ask_user=True, verbose=True)
saturation = 0.5

class Screen:
    def __init__(self):
        self.im = Image.new('RGB',inky.resolution,(255,255,255))
        self.draw = ImageDraw.Draw(self.im)

    def write_text(self, x, y, text, color, font):
        text_l, text_t, text_r, text_b = font.getbbox(text)
        text_w = text_r - text_l
        text_x = x - text_w//2
        text_y = y
        return self.draw.text((text_x, text_y), text, color, font)

    def draw_icon(self, x, y, icon_name):
        icon = Image.open(f'{icon_name}.jpeg')
        icon_w, icon_h = icon.size
        icon_x = x - icon_w//2
        icon_y = y
        return self.im.paste(icon,(icon_x, icon_y))

def create_calendar():
    print("start : calendar screen")
    new_screen = Screen()
    #get_this_month
    d_today = datetime.date.today()
    this_month = d_today.strftime("%mがつ")
    #write_this_month
    new_screen.write_text(inky.width//2, 30, this_month, "black", big_font)
    #get_this_week
    weeks = calendar.monthcalendar(d_today.year, d_today.month)
    for week in weeks:
        if d_today.day in week:
            this_week = week
    #write_weekly_info
    day_of_the_week = ["げつ", "か", "すい", "もく", "きん", "ど", "にち"]
    what_day = ["きょう","きのう","あした"]
    what_day_y = 218
    holiday_y = 83
    seven_divisions_blank_space_x = 10 + inky.width%7//2
    seven_block_space_x = (inky.width - 20)//7
    for i, (day, date) in enumerate(zip(day_of_the_week, this_week)):
        set_x = seven_divisions_blank_space_x +seven_block_space_x*i + seven_block_space_x//2
        new_screen.write_text(set_x, 118, day, "black", middle_font)
        if date==0:
            continue
        #draw_holiday_icon
        if i >= 5 or jpholiday.is_holiday(datetime.date(d_today.year, d_today.month, date)):
            new_screen.draw_icon(set_x, holiday_y, "crown")
        date_str = str(date)
        new_screen.write_text(set_x, 166, date_str, "black", big_font)
        if date < d_today.day:
            new_screen.draw_icon(set_x, 330, "corn")
        if date == d_today.day:
            new_screen.write_text(set_x, what_day_y, what_day[0], "red", small_font)
            new_screen.draw_icon(set_x, 300, "patrol_car")
            url_current=f'https://api.openweathermap.org/data/2.5/weather?lat={LAT}&lon={LON}&appid={API_KEY}&units=metric'
            r_post=requests.get(url_current).json()
            weather = r_post['weather']
            weather_icon = Image.open(icon_dic[weather[0]['icon']]+".jpeg").resize((50, 50))
            new_screen.im.paste(weather_icon, (set_x, 250))
        elif date == d_today.day - 1:
            new_screen.write_text(set_x, what_day_y, what_day[1], "red", small_font)
        elif date == d_today.day + 1:
            new_screen.write_text(set_x, what_day_y, what_day[2], "red", small_font)
    print("finish : calendar screen")
    new_screen.im.save("calendar_screen.jpeg")
    inky.set_image(new_screen.im, saturation = 0.5)
    return inky.show()

def create_weather():
    print("start : weather screen")
    new_screen = Screen()
    url_items = f'https://api.openweathermap.org/data/2.5/forecast?lat={LAT}&lon={LON}&cnt=9&appid={API_KEY}&units=metric'
    post = requests.get(url_items).json()
    time_list = []
    icon = []
    temp = []
    situation = ["いき", "かえり"]
    for i in range(9):
        d=post['list'][i]
        unix = datetime.datetime.fromtimestamp(d['dt'])
        if unix.hour == 6 or unix.hour == 18:
            if len(time_list) == 2:
                break
            time_list.append(unix.strftime('%mがつ%dにち %H:%M'))
            icon.append(d['weather'])
            temp.append(d['main'])
    two_block_space_x = (inky.width - 20)//2
    for i,time in enumerate(time_list):
        weather_x = two_block_space_x*i + two_block_space_x//2
        new_screen.write_text(weather_x, 350, time, "black", middle_font)
        feel_temp = str(round(temp[i]['feels_like']))+ "℃"
        new_screen.write_text(weather_x, 60, feel_temp, "black", big_font)
        weather_icon = icon_dic[icon[i][0]['icon']]
        new_screen.draw_icon(weather_x, 117, weather_icon)
        if "06:00" in time :
            new_screen.write_text(weather_x, 20, situation[0], "black", middle_font)
            new_screen.draw_icon(weather_x, 260, "leave")
        elif "18:00" in time:
            new_screen.write_text(weather_x, 20, situation[1], "black", middle_font)
            new_screen.draw_icon(weather_x, 260, "back")
    print("finish : weather screen")
    new_screen.im.save("weather_screen.jpeg")
    inky.set_image(new_screen.im, saturation = 0.5)
    return inky.show()

# Gpio pins for each button (from top to bottom)
BUTTONS = [5, 6, 16, 24]
# These correspond to buttons A, B, C and D respectively
LABELS = ['A', 'B', 'C', 'D']

def handle_button(pin):
    if pin == BUTTONS[0]:
        print(f'push {LABELS[0]} button')
        create_calendar()
    if pin == BUTTONS[1]:
        print(f'push {LABELS[1]} button')
        create_weather()
    if pin == BUTTONS[2]:
        print(f'push {LABELS[2]} button')
    if pin == BUTTONS[3]:
        print(f'push {LABELS[3]} button')

# Set up RPi.GPIO with the "BCM" numbering scheme
GPIO.setmode(GPIO.BCM)
# Buttons connect to ground when pressed, so we should set them up
# with a "PULL UP", which weakly pulls the input signal to 3.3V.
GPIO.setup(BUTTONS, GPIO.IN, pull_up_down=GPIO.PUD_UP)
# We're watching the "FALLING" edge (transition from 3.3V to Ground) and
# picking a generous bouncetime of 2500ms to smooth out button presses.

for pin in BUTTONS:
    GPIO.add_event_detect(pin, GPIO.FALLING, handle_button, bouncetime=2500)

logging.basicConfig()
schedule_logger = logging.getLogger('schedule')
schedule_logger.setLevel(level=logging.DEBUG)
schedule.every(1).hours.do(create_calendar)
schedule.run_all()

while True:
    schedule.run_pending()
    time.sleep(1)
API_KEY、LAT(緯度)、LON(経度)の部分は適宜書き換えてお使いください。
緯度経度の調べ方は後述のOpenWeather項に記載してあります。
実行環境
pythonと使用したライブラリ、raspberry pi OSのバージョンは下記のとおりです。
pythonと使用ライブラリ
Python 3.7.3
inky 1.4.0
jpholiday 0.1.8
Pillow 9.3.0
requests 2.28.1
RPi.GPIO 0.7.0
schedule 1.1.0
Raspberry pi OSとカーネル
Description: Raspbian GNU/Linux 10 (buster)
Linux raspberrypi 5.10.103-v7+ #1529 SMP Tue Mar 8 12:21:37 GMT 2022 armv7l GNU/Linux
OpenWeather
APIキーを取得し、3つのサービスを利用しました。
- Geocoding API : 天気を取得したい場所の緯度経度を調べる
- Current weather data : 現在の天気を取得する
- 5 day weather forecast : 3時間ごとの天気を取得する
すべて無料で使えます。Pricingページの表 Current weather and forecasts collection の「Free」にある” Get API KEY “をクリックして必要事項を入力すると登録したメールアドレスに登録完了メールがきます。サインインしてMy profileからAPI_KEYを確認できます。
緯度経度を調べるには↓のコードを実行します。country_codeはこちらのWikipediaにのっています。東京の場合JP-13です。
import requests

API_KEY = "ご自身のAPI_KRY"
country_code = "JP-13" #東京の場合
url_items=f'http://api.openweathermap.org/geo/1.0/direct?q={country_code}&limit=5&appid={API_KEY}'
r_post=requests.get(url_items).json()
print(r_post)

"""
結果
[
{
'name': 'Tokyo',
'local_names': {
'sv': 'Tokyo',
'ia': 'Tokyo',
"一部省略"
'fi': 'Tokio'
},
'lat': 35.6828387,
'lon': 139.7594549,
'country': 'JP'
}
]
"""
現在の天気は週間カレンダー、3時間ごとの天気は行き帰りの天気予報画面で使用しています。
使用フォント
うずらフォントを使わせていただきました。すごくかわいい。
ダウンロードしたttfファイルをweather-calendar.py と同じディレクトリに入れます。
使用アイコン
ICOOON MONOさんのものを使わせていただきました。
パトカーだけでも11種類あってどれにするか迷いました。
アイコンの着色はペイント3Dを使用しています。
アイコンは下記サイズにリサイズして使用しています。
| 幅[ px ] | 高さ[ px ] | |
| パトカー | 88 | 90 |
| 三角コーン | 31 | 32 |
| 王冠 | 42 | 32 |
| 天気 | 127 | 128 |
| 家と人 | 127 | 90 |
フォントと同じく、アイコンもweather-calendar.py と同じディレクトリに入れます。
完成
日めくりカレンダーだとめくり忘れることもあるけど、自動更新なのでめちゃくちゃ楽です。
まだボタンが2か所余っているので何かいいアイデアが浮かんだらが表示画面を追加したいと思います。
おまけ・やらかしたこと
だれの参考にもならないかもしれませんが、やらかした集です。
同じ間違いを繰り返さないために、積極的に恥をさらしていくよ!
積み上がっていく無限ループ
最初scheduleモジュールではなく、こんな感じ↓でcronで定期実行し、画面を更新していました。
1 * * * * cd /home/nobo/Documents/7color_calendar; python3 weather-calendar.py 1>normal.txt 2>error.txt
何回か定期実行した後にボタンを押して画面を切り替えようとすると、画面更新中にフリーズする現象が起きました。
画面が反転したり、変な筋が入ったり、電子ペーパーが壊れたかと思いました。
signal.pause()があるものを定期的に実行してしまっていたので、ctrl + C で停止しない限りファイルは動きつづけ、定期実行されるたびに多重起動状態になったことが原因のようでした。
タスクマネージャーを開くとpythonから始まる行が大量にありました。。。
cronを停止しても無限ループは生きているので、再起動してリセットすると解消しました。
cronでの定期実行をやめて、scheduleモジュールで定期実行することにしました。
書き変わるけど更新されない画面
引数をもつ関数をscheduleモジュールで定期実行させようとしたときにハマったことです。
スケジュール登録時点の状態が定期実行されてしまいました。
うーん。文章だとわかりにくいですね。ん?こいつ何言ってるんだ?という感じだと思うのでプログラムで説明します。
import time
import schedule
import datetime

def test_1():
    return datetime.datetime.now()

def test_2(hoge):
    print(hoge)

schedule.every(3).seconds.do(test_2, hoge=test_1())
schedule.run_all()

while True:
    schedule.run_pending()
    time.sleep(1)

#結果
#2023-01-29 05:46:43.764647
#2023-01-29 05:46:43.764647
#2023-01-29 05:46:43.764647
・
・
・
test_1は現在の日付と時刻を戻り値にもつ関数で、test_2は引数をプリント出力する関数です。
test_2の引数にtest_1関数を指定しscheduleモジュールで3秒ごとに定期実行すると
schedule.every(3).seconds.do(test_2, hoge=test_1())
でスケジュールを登録した時点の日付と時刻の出力が繰り返されました。
定期実行時の日付と時刻を出力したかったでの、現在時刻を取得するような関数を定期実行関数の引数に指定するのはやめました。
import time
import schedule
import datetime

#def test_1():
#    return datetime.datetime.now()

def test_2():
    print(datetime.datetime.now())

schedule.every(3).seconds.do(test_2)

while True:
    schedule.run_pending()
    time.sleep(1)

#結果
#2023-01-29 06:06:46.830329
#2023-01-29 06:06:49.835913
#2023-01-29 06:06:52.841145
・
・
・
現在の日付時刻を出力する関数を定期実行すると、定期実行時の日付と時刻が出力されました。
参考サイト・書籍
今回も沢山の方々ににお世話になりました。
電子ペーパーの使い方
もりしーさんのYouTubeとブログを非常に参考にさせていただきました。
これ以外にもraspberry piやpythonに関する動画が沢山あり、いつも勉強させていただいています。個人的には奥様と語る動画シリーズが大好きです。ほっこりします。
python全般
pythonでわからないことがあったらまずはこのサイト様に駆け込みます。大抵のことは解決する。
今まで動かすことに必死でコードをきれいに書くことがおざなりになっていたので↓この本で勉強してみました。

classの使い方とかオブジェクト指向など、聞いたことあるけどよくわからなかったことがこの本のおかげで大分理解できました。
GitHubをつかったバージョン管理の仕方も少し載っています。
OpenWeatherの使い方
【WebAPI】OpenWeatherMapで3時間ごとの天気を取りたい【json】
【Python】raspberry pi 置き時計に天気予報を追加した件
pillowモジュールの使い方
今回のコード以外にも、使用するアイコンのサイズを変えたり、反転させたり、トリミングしたりするのにも使用しました。
Pillow (PIL Fork) 9.4.0 documentation
Pythonの画像処理ライブラリPillow(PIL)の使い方